Step 1: Install Laravel
If you already have a running Laravel project, feel free to skip this step. Otherwise, you can create a new Laravel application by running the following command:
composer create-project laravel/laravel large-csv-import-example-app
This command will generate a new Laravel project named large-csv-import-example-app.
Step 2: Create Products Table and Model
To manage product data, you need to create a database migration for the products table and a corresponding model. Follow the steps below:
2.1. Create the Migration
Run the following Artisan command to generate a migration file for the products table:
php artisan make:migration create_products_table
Edit the migration file to define the products table schema as follows:
<?php

use Illuminate\Database\Migrations\Migration;
use Illuminate\Database\Schema\Blueprint;
use Illuminate\Support\Facades\Schema;

return new class extends Migration
{
    /**
     * Run the migrations.
     */
    public function up(): void
    {
        Schema::create('products', function (Blueprint $table) {
            $table->id();
            $table->string('title');
            $table->string('description');
            $table->timestamps();
        });
    }

    /**
     * Reverse the migrations.
     */
    public function down(): void
    {
        Schema::dropIfExists('products');
    }
};
After adding this code, execute the migration to create the table in your database:
php artisan migrate
2.2. Create the Product Model
Next, generate a model for the products table using the command below:
php artisan make:model Product
Once the Product model is created, update it to define the fillable fields:
<?php

namespace App\Models;

use Illuminate\Database\Eloquent\Factories\HasFactory;
use Illuminate\Database\Eloquent\Model;

class Product extends Model
{
    use HasFactory;

    protected $fillable = [
        'title',
        'description',
    ];
}
Step 3: Configure the Queue
To handle large CSV imports efficiently, you'll need to configure the queue driver. This guide uses the database driver, but you can also choose Redis or other drivers based on your requirements.
Open your .env file and set the queue connection to database:
QUEUE_CONNECTION=database
Step 4: Create Queue Job
In this step, we’ll create a queue job that will handle the CSV import in the background.
1. Create the Queue Job
Run the following command to generate the ImportProductCsv job:
php artisan make:job ImportProductCsv
This command will create a new file at app/Jobs/ImportProductCsv.php. Now, let’s modify the job file to handle the import logic.
2. Modify the Job File
Open the app/Jobs/ImportProductCsv.php file and update the code as follows:
<?php

namespace App\Jobs;

use App\Models\Product;
use Illuminate\Bus\Batchable;
use Illuminate\Contracts\Queue\ShouldQueue;
use Illuminate\Foundation\Bus\Dispatchable;
use Illuminate\Foundation\Queue\Queueable;
use Illuminate\Queue\InteractsWithQueue;
use Illuminate\Queue\SerializesModels;

class ImportProductCsv implements ShouldQueue
{
    use Dispatchable, InteractsWithQueue, Queueable, SerializesModels, Batchable;

    public $data;

    /**
     * Create a new job instance.
     */
    public function __construct($data)
    {
        $this->data = $data;
    }

    /**
     * Execute the job.
     */
    public function handle(): void
    {
        foreach ($this->data as $product) {
            Product::create(['title' => $product[0], 'description' => $product[1]]);
        }
    }
}
Step 5: Create the View File
In this step, we will create a Blade view file called import-product.blade.php to display the form for importing products via a CSV file.
File Location:
resources/views/import-product.blade.php
Open the import-product.blade.php file and add the following code:
<!DOCTYPE html>
<html lang="{{ str_replace('_', '-', app()->getLocale()) }}">

<head>
    <meta charset="utf-8">
    <meta name="viewport" content="width=device-width, initial-scale=1">
    <title>How to Import Large CSV Files in Laravel</title>
    <link href="https://cdn.jsdelivr.net/npm/bootstrap@5.0.0/dist/css/bootstrap.min.css" rel="stylesheet">
</head>

<body>
    <div class="container mt-5">
        <h1>How to Import Large CSV Files in Laravel</h1>

        <form method="post" action="{{ route('importProductStore') }}" enctype="multipart/form-data">
            @csrf

            @if ($message = Session::get('success'))
                <div class="alert alert-success alert-dismissible fade show" role="alert">
                    <strong>{{ $message }}</strong>
                    <button type="button" class="btn-close" data-bs-dismiss="alert" aria-label="Close"></button>
                </div>
            @endif

            <div class="form-group">
                <strong>Choose Large CSV File:</strong>
                <input type="file" name="csv_file" class="form-control" />
            </div>

            <br>
            <div class="form-group text-center">
                <button type="submit" class="btn btn-primary btn-block">Import</button>
            </div>
        </form>
    </div>
</body>

</html>
Step 6: Create a Controller
in the next step, now we have to create a new controller as ImportProductController.
Step 6.1: Generate the Controller
Run the following Artisan command to create the controller:
php artisan make:controller ImportProductController
This command will create a new file located at
app/Http/Controllers/ImportProductController.php. Now, let’s add the necessary code to handle the CSV import.
6.2: Add the Controller Logic
Open the ImportProductController.php file and add the following code:
<?php

namespace App\Http\Controllers;

use App\Jobs\ImportProductCsv;
use Illuminate\Http\Request;
use Illuminate\Support\Facades\Bus;

class ImportProductController extends Controller
{
    /**
     * Show the import product form.
     */
    public function index()
    {
        return view('import-product');
    }

    /**
     * Handle the CSV import.
     */
    public function store(Request $request)
    {
        // Check if the request has a CSV file
        if ($request->has('csv_file')) {
            // Read the file into an array
            $csv = file($request->csv_file);

            // Chunk the CSV data into smaller pieces
            $chunks = array_chunk($csv, 1000);

            // Dispatch a batch of jobs to the queue
            $batch = Bus::batch([])->dispatch();

            foreach ($chunks as $key => $chunk) {
                // Convert each chunk from CSV format
                $data = array_map('str_getcsv', $chunk);

                // Skip the first chunk if necessary (e.g., headers)
                if ($key == 0) {
                    unset($data[0]);
                }

                // Add the job to the batch
                $batch->add(new ImportProductCsv($data));
            }

            // Redirect with a success message
            return redirect()->route('importProductIndex')->with('success', 'CSV Import added to the queue and will be processed soon.');
        }
    }
}
Step 7: Create Routes
In this step, we define the routes for the import product form. One route will display the form (GET request), and the other will handle form submissions (POST request).
File Location:
routes/web.php
Now open the routes/web.php file and add the following routes:
<?php

use App\Http\Controllers\ImportProductController;
use Illuminate\Support\Facades\Route;

// Route to display the import product form
Route::get('import-product', [ImportProductController::class, 'index'])->name('importProductIndex');

// Route to handle the import product form submission
Route::post('import-product', [ImportProductController::class, 'store'])->name('importProductStore');
Run the Laravel App:
Now that all the steps are complete, run the Laravel app using the following command:
php artisan serve
Open your web browser and go to the following URL to view the app output:
http://127.0.0.1:8000/import-product
Start the Queue Worker:
To process the queued jobs, you'll need to start the queue worker using the following command:
php artisan queue:work --timeout=0
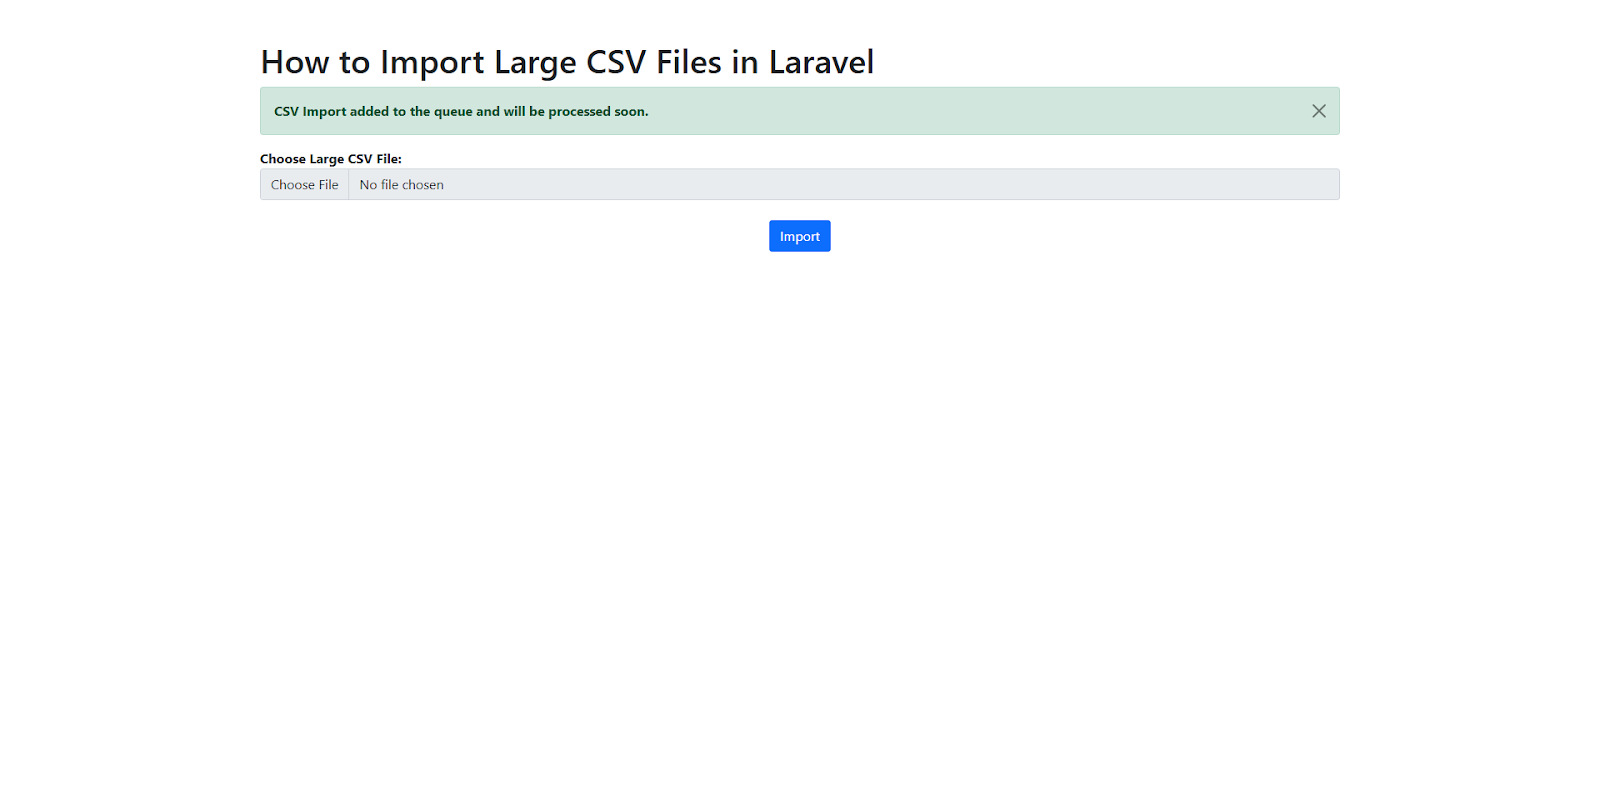
Below is the screen we can see after the CSV file is chosen and submitted:
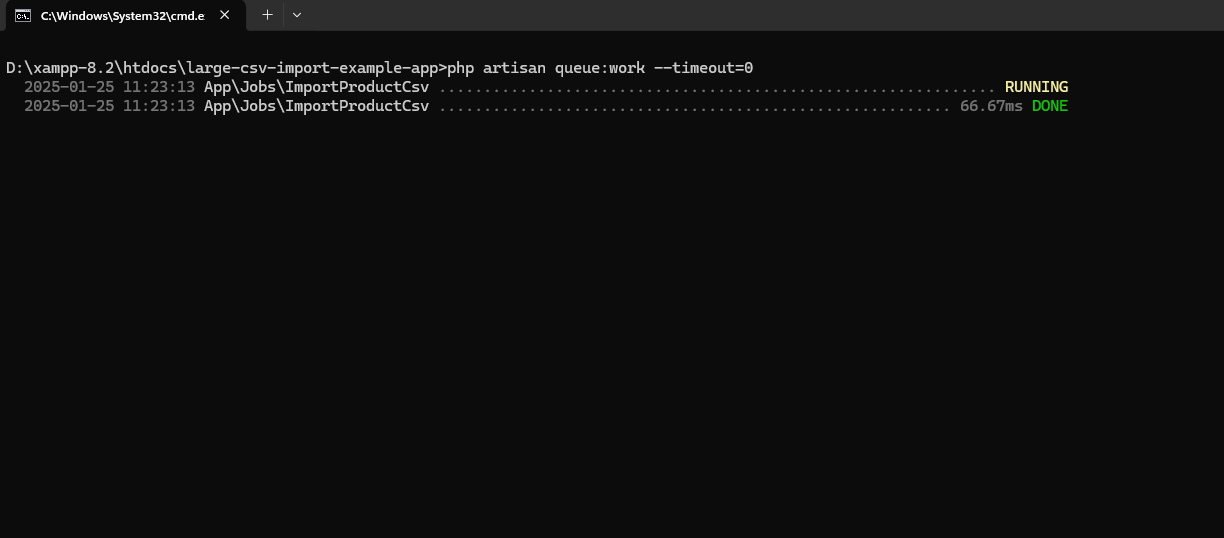
Below is the screen where we can see that the Queue executed successfully:
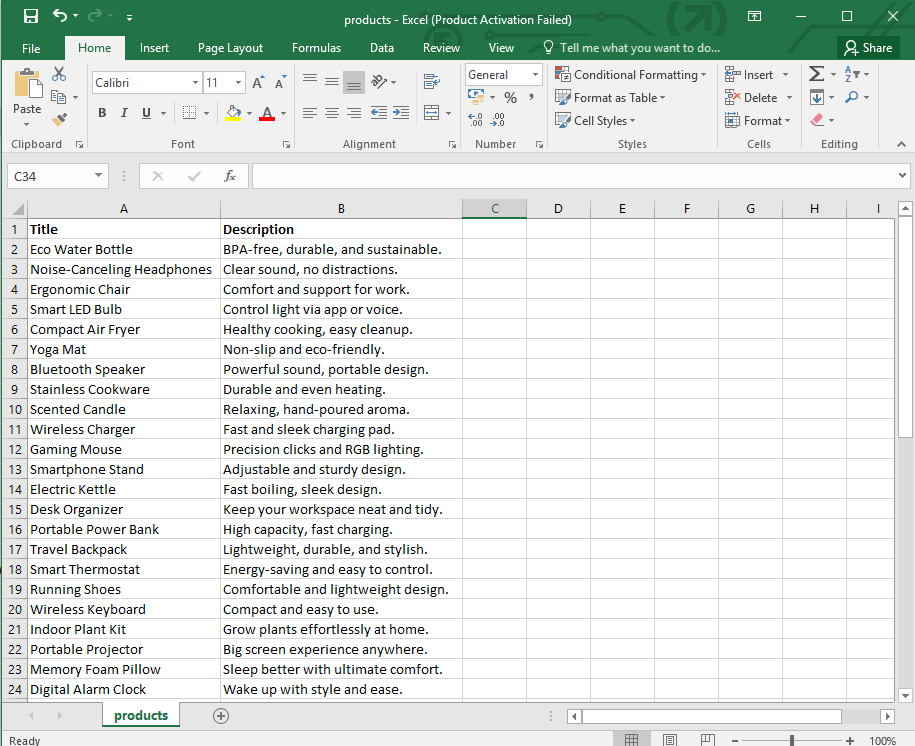
Below is the screenshot of the imported CSV file: